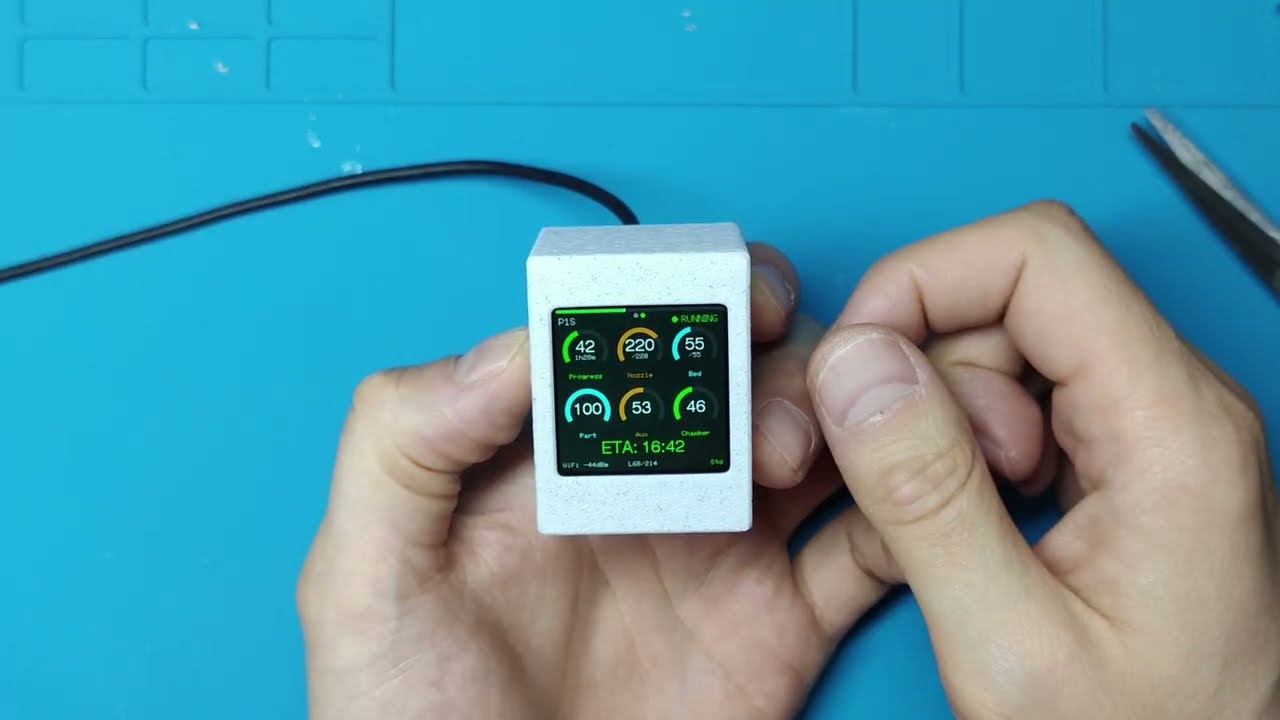
Dedicated Bambu Lab printer monitor built with ESP32-S3 Super Mini and a 1.54" 240x240 color TFT display (ST7789).
Connects to your printer via MQTT over TLS and displays a real-time dashboard with arc gauges, animations, and live stats.
| Connection Mode | Printers | How it connects |
|---|---|---|
| LAN Direct | P1P, P1S, X1, X1C, X1E, A1, A1 Mini | Local MQTT via printer IP + LAN access code |
| Bambu Cloud (All printers) | Any Bambu printer | Cloud MQTT via access token - no LAN mode needed |
Tip: Use "Bambu Cloud (All printers)" if you don't want to enable LAN mode on your printer (e.g. to keep Bambu Handy working), if your ESP32 is on a different network than the printer, or if your printer only supports cloud mode (H2C, H2D, H2S, P2S).
When using Bambu Cloud, BambuHelper connects through Bambu Lab's cloud MQTT service. Here's what you need to know:
- No credentials are stored - BambuHelper never asks for your email or password. You extract an access token from your browser and paste it into the web interface.
- Only the access token is stored in the ESP32's flash memory. This token expires after ~3 months, at which point you simply paste a new one.
- Read-only access - BambuHelper only reads printer status. It never sends commands or modifies printer settings.
- Same approach as other community projects - this is the same authentication method used by the Home Assistant Bambu Lab integration (15,000+ users), OctoPrint-Bambu, and other trusted third-party tools.
| Dashboard | Web Interface - Settings | Web Interface - Gauge Colors |
|---|---|---|
- Live dashboard - progress arc, temperature gauges, fan speed, layer count, time remaining
- H2-style LED progress bar - full-width glowing bar inspired by Bambu H2 series
- Anti-aliased arc gauges - smooth nozzle and bed temperature arcs with color zones
- Animations - loading spinner, progress pulse, completion celebration
- Web config portal - dark-themed settings page for WiFi, network, printer, display, and power settings
- Network configuration - DHCP or static IP, with optional IP display at startup
- Display auto-off - configurable timeout after print completion, auto-off when printer is off
- NVS persistence - all settings survive reboots
- Auto AP mode - creates WiFi hotspot on first boot or when WiFi is lost
- Smart redraw - only redraws changed UI elements for smooth performance
- Customizable gauge colors - per-gauge arc/label/value colors with preset themes
- Multi-printer support - monitor up to 2 printers simultaneously with auto-rotating display
- Smart rotation - automatically shows the printing printer; cycles between both when both are printing
- Physical button - optional push button or TTP223 touch sensor to cycle printers and wake display
- Exponential backoff - reconnect attempts to offline printers gradually slow down to conserve resources
| Component | Specification |
|---|---|
| MCU | ESP32-S3 Super Mini |
| Display | 1.54" TFT SPI ST7789 (240x240) |
| Connection | SPI |
Display: 1.54": https://a.aliexpress.com/_EG9y7wc
ESP32-S3 SuperMini: https://a.aliexpress.com/_Eyk9GdA
Optional: TTP223 touch button or standard push button for multi-printer switching (auto printer switching works without button anyway, change settings in web interface)
Optional: Passive buzzer for print finish/error notifications: https://aliexpress.com/item/1005008825917787.html
Optional case seen on picture: https://makerworld.com/en/models/2501721
| Display Pin | ESP32-S3 GPIO |
|---|---|
| MOSI (SDA) | 11 |
| SCLK (SCL) | 12 |
| CS | 10 |
| DC | 9 |
| RST | 8 |
| BL | 13 |
| GND | GND |
| VCC | 3.3V |
Adjust pin assignments in platformio.ini build_flags to match your wiring.
Touch TTP223 button is optional, it is used to switch between printers, you may use standard push button and connect it between pin 4 and GND. Then pick correct button setting in web interface under Multi-Printer support
- Download the latest
BambuHelper-WebFlasher.binfrom Releases - Open ESP Web Flasher in Chrome or Edge
- Connect your ESP32-S3 via USB
- Click Connect and select your device
- Set flash address to 0x0
- Select the downloaded
.binfile - Click Program

-
Flash the firmware (see above)
-
Connect to the
BambuHelper-XXXXWiFi network (password:bambu1234) -
Open
192.168.4.1in your browser -
Enter your home WiFi credentials and Save - the device restarts and connects to your WiFi
-
Note the IP address shown on the ESP32 display after it connects to WiFi
-
Open that IP address in your browser to access the full web interface
-
Configure your printer:
LAN Direct (P1P, P1S, X1, X1C, X1E, A1, A1 Mini):
- Printer IP address (found in printer Settings > Network)
- Serial number (see note below)
- LAN access code (8 characters, from printer Settings > Network)
Bambu Cloud (All printers):
- Get your Bambu Cloud access token from your browser (see Getting a Cloud Token below)
- Paste the token into the web interface
- Enter your printer's serial number (see note below)
Important: Serial number is NOT the printer name. The serial number is a 15-character code (e.g.
01P00A000000000) found on the printer LCD under Settings > Device > Serial Number, or on the physical label on the back/bottom of the printer. Do not confuse it with the printer name shown in Bambu Studio (e.g.3DP-01P-110), which is a shortened version and will not work. -
Save Printer Settings - the device connects to your printer
To use cloud mode, you need an access token from your Bambu Lab account. There are two ways to get it:
Using browser DevTools (Chrome / Edge):
- Open https://bambulab.com and log in to your account
- Press F12 to open DevTools
- Go to the Application tab (click
>>if you don't see it) - In the left sidebar, expand Cookies → click
https://bambulab.com - Find the row named
tokenin the cookie list - Double-click the Value cell to select it, then Ctrl+C to copy
- Paste the value into BambuHelper's "Access Token" field in the web interface
Using browser DevTools (Firefox):
- Open https://bambulab.com and log in to your account
- Press F12 to open DevTools
- Go to the Storage tab
- In the left sidebar, expand Cookies → click
https://bambulab.com - Find the row named
token - Double-click the Value cell to select it, then Ctrl+C to copy
- Paste the value into BambuHelper's "Access Token" field
Using browser DevTools (Safari):
- Open https://bambulab.com and log in to your account
- Open Develop → Show Web Inspector (enable the Develop menu first in Safari Preferences → Advanced)
- Go to the Storage tab → Cookies →
bambulab.com - Find and copy the
tokenvalue - Paste it into BambuHelper's "Access Token" field
Using the Python helper script (recommended):
pip install curl_cffi
python tools/get_token.py
The script will prompt for your email, password, and 2FA code, then print the token. Copy and paste it into BambuHelper's web interface.
Note: The token is valid for approximately 3 months. When it expires, the ESP32 will fail to connect - simply repeat the process above to get a fresh token and paste it in the web interface. Make sure to select the correct Server Region (US/EU/CN) to match your Bambu account's region.
The built-in web interface (accessible at the device's IP address) provides the following settings:
- SSID - your home WiFi network name
- Password - WiFi password
- IP Assignment - choose between DHCP (automatic) or Static IP
- Static IP fields (when static is selected):
- IP Address
- Gateway
- Subnet Mask
- DNS Server
- Show IP at startup - display the assigned IP on screen for 3 seconds after WiFi connects (on by default)
- Connection Mode - LAN Direct or Bambu Cloud (All printers)
- LAN mode fields:
- Printer Name, Printer IP Address, Serial Number, LAN Access Code
- Cloud mode fields:
- Server Region (US/EU/CN), Access Token, Printer Serial Number, Printer Name
- Live Stats - real-time nozzle/bed temp, progress, fan speed, and connection status
- Brightness - backlight level (10–255)
- Screen Rotation - 0°, 90°, 180°, 270°
- Display off after print complete - minutes to show the finish screen before turning off the display (0 = never turn off, default: 3 minutes)
- Keep display always on - override the timeout and never turn off
- Show clock after print - display a digital clock with date instead of turning off the screen (enabled by default)
- Theme presets - Default, Mono Green, Neon, Warm, Ocean
- Background color - display background
- Track color - inactive arc background
- Per-gauge colors (arc, label, value) for:
- Progress
- Nozzle temperature
- Bed temperature
- Part fan
- Aux fan
- Chamber fan
- Factory Reset - erases all settings and restarts
| Screen | When |
|---|---|
| Splash | Boot (2 seconds) |
| AP Mode | First boot / no WiFi configured |
| Connecting WiFi | Attempting WiFi connection |
| WiFi Connected | Shows IP for 3s (if enabled) |
| Connecting Printer | WiFi connected, waiting for MQTT |
| Idle | Connected, printer not printing |
| Printing | Active print with full dashboard |
| Finished | Print complete with animation (auto-off after timeout) |
| Clock | After finish timeout (if enabled) - shows digital clock with date |
| Display Off | After finish timeout (if clock disabled) or printer powered off |
- After a print completes, the finish screen is shown for a configurable duration (default: 3 minutes), then either a digital clock is displayed or the screen turns off (configurable).
- When the printer is powered off or disconnected, the display stays in its current state (clock or off).
- When the printer comes back online or starts a new print, the display automatically wakes up.
- The "Keep display always on" option overrides the auto-off behavior.
- The "Show clock after print" option (enabled by default) shows time and date instead of turning off the display.
include/
  config.h              Pin definitions, colors, constants
  bambu_state.h         Data structures (BambuState, PrinterConfig, ConnMode)
src/
  main.cpp              Setup/loop orchestrator
  settings.cpp          NVS persistence (WiFi, network, printer, display, power, cloud token)
  wifi_manager.cpp      WiFi STA + AP fallback, static IP support
  web_server.cpp        Config portal (HTML embedded, token management)
  bambu_mqtt.cpp        MQTT over TLS, delta merge (local + cloud broker)
  bambu_cloud.cpp       Bambu Cloud helpers (region URLs, JWT userId extraction)
  button.cpp            Physical button / touch sensor input
  display_ui.cpp        Screen state machine
  display_gauges.cpp    Arc gauges, progress bar, temp gauges
  display_anim.cpp      Animations (spinner, pulse, dots)
  clock_mode.cpp        Digital clock display (after print finishes)
  icons.h               16x16 pixel-art icons
tools/
  get_token.py          Python helper to get Bambu Cloud token on PC
- PlatformIO (VS Code extension or CLI)
- LAN mode: Bambu Lab printer with LAN mode enabled, printer and ESP32 on the same local network
- Cloud mode: Bambu Lab account, ESP32 with internet access
BambuHelper supports monitoring up to 2 printers simultaneously via dual MQTT connections.
| Mode | Behavior |
|---|---|
| Smart (default) | Shows the printing printer. If both are printing, cycles between them. If neither is printing, shows last active. |
| Auto-rotate | Cycles through all connected printers at a configurable interval (10s – 10min). |
| Off | Manually switch between printers using the physical button only. |
An optional physical button can be connected to cycle between printers and wake the display from sleep.
| Type | Wiring | How it works |
|---|---|---|
| Push button | One pin to configured GPIO, other pin to GND | Active LOW with internal pull-up |
| TTP223 touch sensor | VCC→3.3V, GND→GND, SIG→configured GPIO | Active HIGH |
The button type and GPIO pin are configurable in the web interface (Multi-Printer section) — no recompilation needed.
When a printer is physically powered off, BambuHelper uses exponential backoff to avoid wasting resources on repeated connection attempts:
| Phase | Attempts | Interval |
|---|---|---|
| Normal | First 5 | Every 10 seconds |
| Phase 2 | Next 10 | Every 60 seconds |
| Phase 3 | Beyond 15 | Every 120 seconds |
When the printer comes back online, the backoff resets to normal immediately.
SPI display cables near the ESP32 antenna can cause WiFi interference. The ESP32-S3 Super Mini has a PCB antenna at one end of the board. If the SPI wires to the display run close to or over this antenna area, RF interference can prevent WiFi from connecting or cause frequent disconnections.
Fix: Route the display cables away from the antenna end of the ESP32-S3. Even 1–2 cm of separation can make a significant difference. If using a breadboard, ensure the wires don't loop back over the ESP32 module.
Symptoms:
- "Connecting to WiFi" screen appears briefly, then falls back to AP mode
- WiFi connects sometimes but drops after a few seconds
- Works fine when display is disconnected
If WiFi issues persist Perform an antenna mod by soldering two individual goldpins to the antenna pads, as shown in the picture.
- LAN Direct: Make sure the printer and ESP32 are on the same network. Check that LAN mode is enabled on the printer and the access code is correct.
- Bambu Cloud: Verify the access token hasn't expired (~3 months validity). Re-extract from your browser and paste again. Check the server region matches your Bambu account.
- If a printer is physically powered off, reconnect attempts will gradually slow down (backoff). It will reconnect automatically when the printer comes back online.
- Check rotation mode in the web interface (Multi-Printer section). Smart mode only switches automatically when a printer is actively printing.
- Press the physical button (if configured) to manually cycle between printers.
- OTA firmware updates
- Multi-language support
MIT